Recently when working with Microsoft on task sequence issues, they suggested not to use wrapper scripts on the MSI applications we installed in the task sequence and instead create an MSI deployment type and let SCCM handle the MSI execution. I have been packaging for many years and for basic MSI’s with no custom configuration I use the SCCM MSI deployment type. However, for more complex installs, wrapper scripts are just easier but we were willing to try anything to get these random MSI execution errors to stop.
Unwrapping the applications was going great until I started to work on Java Runtime and Pulse Secure. The issue with Java was more complex, so I am going to discuss the issue with Pulse. This VPN software had a parameter to pass the default configuration file. The gotcha was that the entire path to the file was needed. As far as I am aware, in SCCM there is not a method to state the path in the command line of the application object. This meant I had to find a method to add the file to the computer in a location where I could specify the full path name on the command line. To copy the file, using the same application object, I would need to create a transform file to copy the file and then reference the MST in the command line. I have used Orca to create basic transform files over the years, but this was a more advanced option. It took several hours of Google searches and broken links since most of the information was from the early 2000 but I managed to figure it out. While this is old technology, I figured I would write the process down, so I would know what to do if I ever had to do this again.
Install Orca Utility
First things first, you need to install Orca on your computer. Orca is a free Microsoft MSI utility that is included in the Windows SDK. You will need to download the installer from the Windows 10 SDK website. You only need to download the installer; the full ISO is not needed. Once you have the installer downloaded, start the installation and install the “MSI Tools” only.

Once the install completes, the MSI’s to install Orca are available on your computer. The files are located at C:\Program Files (x86)\Windows Kits\10\bin\10.0.17763.0\x86. Install both “Orca-x86_en-us.msi” and “MsiVal2-x86_en-us.msi”.
Create Transform
My goal is to copy a file call “Default.jnprpreconfig” to a location on the C drive of the computer. I will be placing the file in the c:\temp folder.
To start the process, open the MSI file with Orca. Right-click on the file and select Edit with Orca. This will open the Orca editor.

Create a new transform file by selecting Transform from the menu and then New transform.
To add a file the following tables will need to be modified:
- Component
- Directory
- FeatureComponents
- File
- Media
- And depending on the MSI MSIFileHash
Component Table
First, we need to add the new component. To do this you will need to generate a GUID with upper case letters and curly brackets {}. I used https://www.guidgenerator.com/ for mine.

Select the Component table. Right-click in the right-side pane and select Add Row. A dialog box will be displayed with the information that is required.
- Component: enter the name you will use reference the new component. This must be unique, and it is a key field. I will name mine ConfigFile.
- ComponentID: this is the GUID created above.
- Directory_: this will be the unique name you will reference the folder as. I will call mine Temp.
- Attributes: Enter 0. For more information on this field reference the MSI Documentation
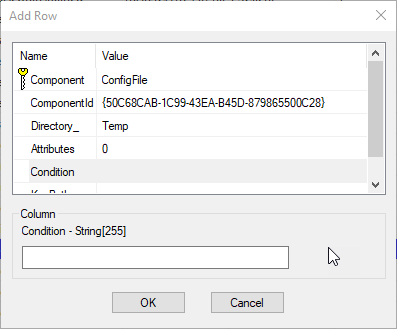
No other Names need to be entered. Just click the OK button.
Directory Table
Next, select the Directory table. Right-click in the right-side pane and select Add Row. There are three fields that need to be completed: Directory, Directory_Parent, DefaultDir.
- Directory: Unique name to reference the folder as this is the “Directory_” field name entered above. I called mine Temp.
- Directory_Parent: This is the folder that contains the folder the file will be copied to. Since I am placing my file in the folder off the root of C, my directory parent is TARGETDIR. TargetDir is a special variable that references the root drive the application will be installed on. It should already be defined.
-
DefaultDir: This is both the source and destination folders that the file will be placed in. For the source folder you have two options; duplicate the folder structure for the file in the folder that contains the MSI and MST, or have the file located in the same folder as the MSI and MST. I prefer the file in the same folder as the MSI and MST, so my source folder will have 3 files in it. This means my DefaultDir will use a colon to separate the target and source locations: [target]:. The target location is c:\temp. The source location is the same folder as the MSI which is represented by a period. This makes the DefaultDir “Temp:.”.

This completes the information to add the directory row. Just click on the OK button to add the row.
FeatureComponents table
Next, select the FeatureComponents table. This table links the new component create above to an existing feature. For this example, my MSI only has 1 Feature_ so I will use it. Once again right-click and add row.
- Feature_: An existing feature in the MSI. Mine will be PulseSecure.
-
Component_: this is the Component created above. In my case it is ConfigFile.

This completes the information to add the row. Just click on the OK button to add the row.
File Table
Next, select the File table. This is where we associate the new component with the file name. First sort the table by Sequence. Find the largest sequence number. The new row will have the next sequence number. In my table, 995 is the last sequence number. Right-click and add a new row.
- File: The file name
- Component_: this is the Component created above. In my case it is ConfigFile.
- FileName: If the file name does not follow 8.3 short name notation, you will need to enter both the short file name and the long file name separated by vertical bar (|). To find the short file name. Open a command prompt and perform a “dir /x” in the folder that contains the folder. This will return the short file name. My file name is DEFAUL~1.JNP|Default.jnprpreconfig.
- FileSize: This is the file size in bytes.
- Version: If there is file version information, enter it.
- Language: if there is file language information, enter it.
- Attributes: Since this file is not in a compressed cab file, the attribute is 8192. See MSI Documentation for more information on this field.
-
Sequence: this is the next sequence number in the table. Since my last sequence number was 995, I will enter 996.
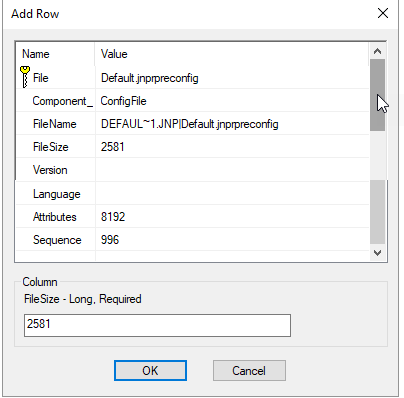
This completes the information to add the row. Just click on the OK button to add the row.
Media Table
Select the Media Table. This table list the files that make up the media source. We will be adding another row for the new file name.
- DiskID: the next sequential number in the table. Mine will be 2.
-
LastSequence: the sequence number provided in the File table. Mine will be 996.

No other information needs to be entered on the row. Click on the OK button to add the row.
MSIFileHash Table
If this table exists, select it. Not all MSI’s include this table. Only unversioned files need to add to this table. The file has can be obtained via C++ MsiGetFileHashA function, or by using MSI functions from PowerShell Gallery. I used the PowerShell Gallery function.
Open an elevated PowerShell window and set the location to the folder with the file to be added.
Type: Install-Module -Name MSI
Type: A <to accept installing untrusted module>
Type: Get-MSIFileHash -path .\Default.jnprpreconfig <your file name>
This will return the file hash to be added to the table.

Go back the Orca editor and add a row to the MSIFileHash table.
- File_: the name provided for File field in the File table. My example is Default.jnprpreconfig
- Option: enter 0
-
HashPart1 – HashPart4: enter the hash numbers returned by the PowerShell command.
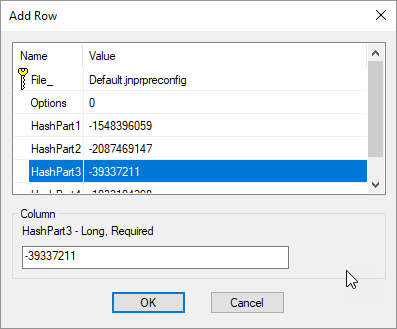
This completes the information to add the row. Just click on the OK button to add the row.
Run Validation Test
Once all the information has been entered in the MSI, run a validation test to ensure there are no syntax errors. I use file validation test ICE03. In the Orca editor menu, select tools / validate
- In the ICEs to Run: enter ICE03
- Uncheck Show “INFO” Messages
- Click on the Go button.
- Review the results to ensure there are no Errors. If there are any errors, correct them now.
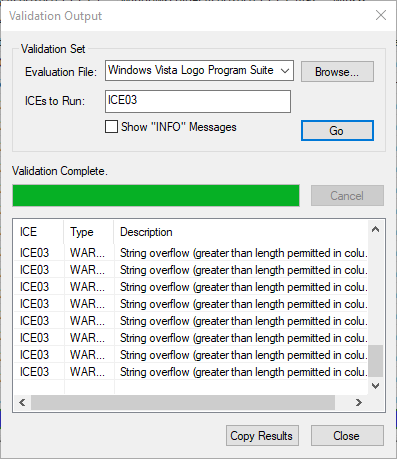
Click on the Close button.
Generate Transform
Now that the rows have been added, you can generate the transform file. From the menu bar, select Transform and Generate Transform. Browse to the folder to save the file in and provide a name for the transform file. Once you are done, exit the Orca editor. You will be unable to use the MSI file while it is open.
Conclusion
That is how I added a file to the transform file. It was interesting to find a method to deploy MSI file using native functions instead of a wrapper script. I am not sure I will give up wrapper scripts for everything, but it is always good to have more than one tool for a job.
References:
https://www.symantec.com/connect/articles/adding-external-file-existing-msi
https://docs.microsoft.com/en-us/windows/desktop/msi/database-tables

Leave a comment